It is lovely to know that you make an effort to turn your kitchen waste into valuable material for your garden. You can only get the best of this practice with good knowledge of composting; its procedures and usage.
Composting is the natural process of recycling organic waste such as kitchen scraps, yard trimmings, and paper products by allowing them to slowly break down into a nutrient-rich material called compost. This is best done in an enclosure called the compost bin.
What To Add Inside the Compost Bin
The compost ingredients are generally waste from the kitchen and garden; they include kitchen scraps, used potting soil, grass cuttings or fruit and veg scraps, and rotted leaves. Shredded paper is great to add to your compost bin; it is a carbon-rich compost ingredient.
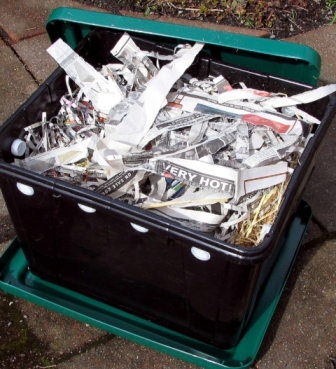
All these ingredients should be chopped into smaller pieces before adding them to the compost bin. This makes them break down faster, and easily managed. Over time, the compost ingredients “cook down” and allow lots of red wigglers to thrive and replicate in there to aid the composting process.
Composting is best done outdoors; It takes take 2-3 months for the materials in the compost bin to fully decompose. the compost bin can be stationed under a shade so it stays moist. You should use a composting bin with a lid to keep out animals.
When to Stop Adding to a Compost Bin
In cold climates, it’s best to stop adding new materials to your compost bin in the fall. This gives the materials already in the bin time to finish breaking down before winter hits.
Cold temperatures will dramatically slow down the composting process. Any unfinished materials are likely to just sit there frozen all winter long.
In warm climates, you can keep adding materials year-round. However, watch your compost pile closely. If the materials don’t seem to be decomposing well or reducing in volume, stop adding more.
This is a sign your pile has become unbalanced and needs time to work through what’s already there. An overstuffed, stagnant pile will take a long time to produce finished compost.
Some key signs your compost bin is overly full and not processing materials:
- The pile is damp and dense but not heating up.
- You’re adding a lot of brown materials but the pile stays soggy.
- The pile has a strong ammonia or rotten smell.
- The pile is attracting a lot of flies instead of beneficial decomposers.
Give your bin a chance to catch up during warmer seasons before adding more. Turn and fluff up the pile to jumpstart the decomposition process again.
Signs Your Compost Bin Is Full
When a compost bin is full and ready to be emptied, there are a few clear signs to look out for.
The most obvious is that the compost pile will remain mound-shaped and will not reduce in size, even after a long period. Typically, a full compost bin should shrink and condense as materials break down, but if it stays the same size, the bin is likely at capacity.
Another indicator is that the compost bin will be difficult to close properly. Compost needs air circulation to decompose, so a full bin with little room for air will struggle to latch or close tightly. Pressure can build up inside a packed bin, making the lid not sit flush.
Finally, the contents of an overly full compost bin will not show signs of breaking down. New food scraps and plant materials added to the top will sit there untouched, with minimal decomposition. This is a clue that the compost does not have enough space to decompose properly.
What To Do When Your Compost Bin Is Full
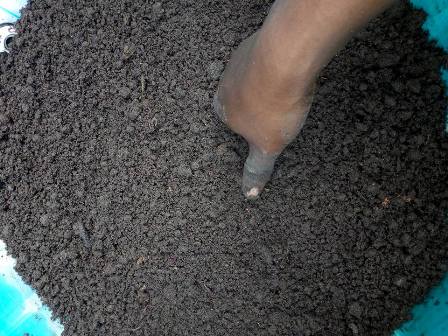
When your compost bin is full, it’s time to remove the finished compost from the bottom of the pile. The finished compost will be dark, crumbly, and soil-like in texture. Here’s how to remove and use your finished compost:
– Carefully scoop out the finished compost from the bottom and sides of the compost bin or pile. Try not to disturb the unfinished compost materials above. The finished compost is readily identifiable at the bottom of the bin as the dark, crumbly, soil-like layer.
– Once you’ve removed the finished compost, it’s a good idea to pass it through a compost screening or wire mesh. This will filter out any chunks of unfinished materials, stones, sticks, etc. You want a finely textured, crumbly compost to mix into soil.
– Now your compost is now ready to use. Mix it into garden beds and soil as an organic fertilizer. Or store your finished compost in bins or bags for later use.
Compost adds key nutrients for plant growth and helps improve soil structure and moisture retention. It is best to revamp loose or deteriorated soils.
Related: Learn How To Make Compost Manure Within 4 Days
Ways Compost Can Be Used
Compost is considered finished when it is dark, crumbly, and rich in nutrients. This finished compost has many useful applications in the garden and landscape.
1) Mix into Garden Beds & Flower Pots:
One of the most common uses for finished compost is mixing it into garden beds and flower pots as part of the soil blend. Compost improves soil texture and nutrients for plants. Mix 1-3 inches of compost into the top 6-8 inches of soil before planting.
2) Top-Dress Lawns
Spreading a thin layer of compost over lawns, known as top-dressing, provides nutrients, helps with drainage, and improves soil structure. Use a quarter inch of compost per year. Spread with a shovel then rake gently to work into grass.
3) Used as Mulch Around Trees & Shrubs
Applying 2-3 inches of compost around the base of trees and shrubs provides nutrients and beneficial microbes. Keep the compost a few inches away from trunks to prevent disease. Top dress beds annually or biannually.
Maintenance of Compost Bin
Keeping your compost bin in optimal condition ensures efficient decomposition of organic materials into rich, usable compost. Here are some tips for maintaining compost bin perfection:
– Review bin size: Make sure your bin is large enough to handle the volume of compostable materials you generate, but not overly huge. Aim for a capacity of 1 cubic yard (3 feet x 3 feet x 3 feet) for average households.
– Review added materials: Take stock of what you’ve been adding to the bin. Aim for a mix of 2 parts “browns” (dry leaves, sawdust, straw) to 1 part “greens” (food scraps, grass clippings). Don’t add meat, oils, or dairy which can attract pests and cause odors.
– Check moisture levels: Squeeze a handful of compost. It should feel damp but not saturated. Add water or more brown material if too wet. Mist with water if too dry. Proper moisture helps beneficial microbes thrive.
– Stir the bin: Turn and stir the compost 2-3 times a week with a pitchfork or compost aeration tool. This mixes materials and improves aeration.
– Monitor temperature: Compost heats up during decomposition. Temperatures between 90-140°F indicate an active compost pile. If cooler, remix and add nitrogen-rich greens.
Based on your review, make tweaks to moisture, aeration, ingredients, or size to get your compost bin into peak form for efficient, rapid decomposition. A balanced and well-maintained bin will produce usable compost in 2-3 months.
End Notes
Proper management of the compost bin can improve the quality of the compost made. Within, 2 – 3 months, your compost is ready for use. It is safe for the garden plants and soil.
Feel free to ask your questions in the comment section below and share this article using the share button for the benefit of more gardeners.