Incubating duck eggs and hatching ducklings is a fascinating experience for backyard poultry enthusiasts and small farmers. While the process is similar to hatching chicken eggs, there are some key differences to be aware of when hatching ducks.
Duck eggs can be hatched with or without an incubator. However, the incubator is the safest and most effective way to hatch ducks. With an incubator, you can increase the flock size, help non-brooding ducks hatch their eggs, and enjoy homegrown duck eggs.
Equipment Needed for Incubating Duck Eggs
When getting started, the basic supplies needed are:
- an incubator
- fertile duck eggs from a breeder
- proper bedding like wood shavings for the incubator
- brooder setup.
The incubator maintains the optimal temperature, humidity, and egg turning that duck eggs need to hatch. Only fertile eggs can hatch. The brooder provides warmth and safety for the ducklings after hatching.
Compared to chicken eggs, duck eggs generally take a little longer to incubate and hatch. The incubation period is around 28 days. There are also some differences in temperature and humidity levels. Paying close attention to these incubator settings helps ensure healthy duckling hatches.
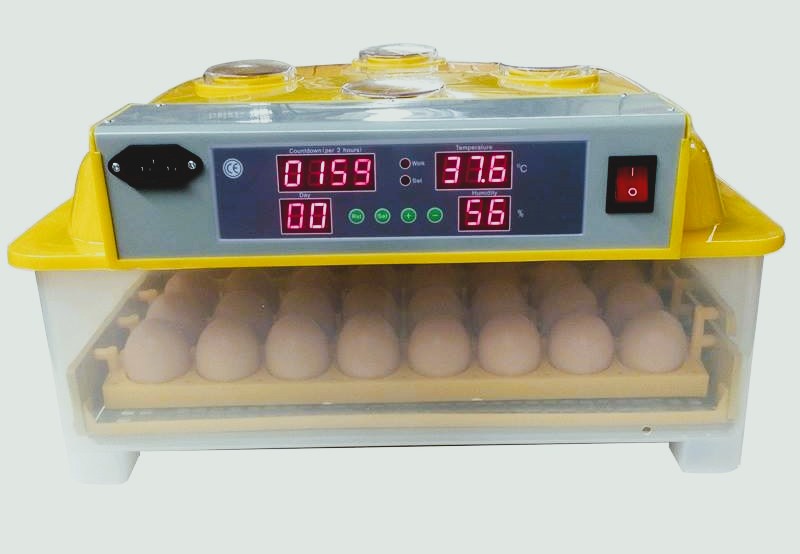
Types of Incubators for hatching Duck eggs
When incubating duck eggs, you’ll need to select an incubator designed for poultry that can maintain the proper temperature, humidity, and egg turning. The two main types of incubators are still air and forced air models.
1) Still Air Incubators
Still air incubators rely on passive convection to circulate the air. The incubator contains a heating element on the bottom that warms the air, causing it to rise and circulate the eggs. Still air models are simple, quiet, and relatively affordable.
However, they require more diligence in monitoring the temperature and humidity levels. Opening the incubator too often can disrupt the delicate environment. Still air incubators are best suited for smaller batches with up to 24 duck eggs. It can be challenging for them to distribute heat in larger capacities evenly. The lack of a fan also means maintaining the humidity can be harder.
2) Forced Air Incubators
Forced air or fan-assisted incubators have a built-in fan that circulates the warm air around the eggs. This active air circulation helps maintain a consistent temperature throughout the incubator and prevents hot or cold spots from developing.
Forced air models more precisely regulate the temperature and humidity levels. The fan runs continuously to stabilize the internal environment. This makes them ideal when incubating larger batches of 25 eggs or more.
Forced air incubators often have more controls and settings. You can adjust the fan speed and ventilation to customize humidity and airflow as needed. They provide very stable conditions suitable for duck eggs. Just be aware the fan noise can potentially startle hatchlings when they pip, so monitor them closely at the end.
Ideal Temperature for Duck Eggs
The ideal temperature range for incubating duck eggs is 37.5-38.0°C (99.5-100.5°F) during the 25-28 day incubation period. This slightly lower temperature compared to chicken eggs (37.8°C/100°F) is important because ducklings generate more heat in the egg than chicks.
It’s critical to maintain a consistent temperature in your incubator without fluctuations. Temperatures that are too low can cause slow embryo development, while excessive heat kills the embryo. Monitor and adjust the temperature of your incubator regularly.
Aim to keep the temperature between 37.5-38.0°C for the first 25 days. Then in the final 3 days before hatching, lower the temperature slightly to 37.2°C/99°F. This drop in temperature triggers the ducklings to hatch.
After setting up your incubator, monitor the temperature for 24 hours before placing eggs inside. Make small adjustments to calibrate the temperature within the ideal range. It’s also important that the incubator provides uniform heating. If you notice hot or cold spots, rearrange the eggs or adjust the incubator to achieve even warmth distribution.
Humidity Levels
Proper humidity is crucial for successfully incubating duck eggs. The ideal humidity range is 50-60% for the first 25 days. Higher humidity helps the duckling hatch by keeping the membrane around it from drying out and getting sticky. This allows the duckling to rotate and pip the egg more easily.
You can increase humidity by:
- Adding more water to the incubator’s water channels or reservoirs
- Using a sponge or damp cloth in the incubator
- Misting the eggs lightly with water
To decrease humidity:
- Allow more ventilation into the incubator by opening vents
- Remove or reduce water sources
- Add moisture absorbers like silica gel packs
Check humidity levels daily with a hygrometer. Make small adjustments over several days to reach the target range. Keep the humidity between 65-75% for the last 3 days before hatching to help the ducklings pip the shell and fully emerge.
Turning the Eggs
Turning the eggs is an important part of the incubation process for duck eggs. It helps prevent the embryo from sticking to the inside of the shell and promotes even growth and development.
Duck eggs should be turned at least 3 times per day during incubation. Turning them more frequently, such as 5-6 times per day, is even better. Turning prevents the embryo from adhering to the inside of the shell. If it sticks in one place, development can become uneven.
The turning schedule should start on day 1 of incubation. Turn the eggs an odd number of times per day so they don’t end up in the same orientation for too long. Marking an “X” on one side of each egg can help you keep track of the turning schedule.
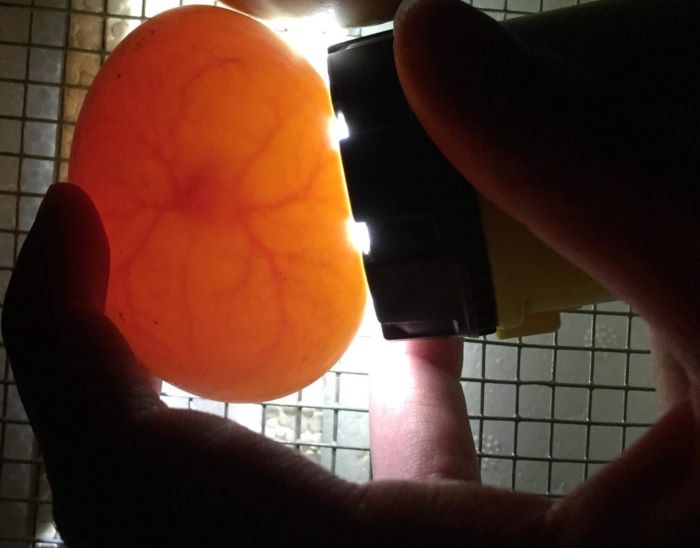
Candling the Eggs
Candling allows you to monitor the development of the duck embryos without opening the eggs. It’s done by shining a bright light through the egg to see inside. The result of the candling exercise can determine the hatchability of the eggs.
You should start candling the eggs around day 7-10 of incubation. At this point, you should be able to see the outline of the embryo and a network of blood vessels. A fertile egg will have a dark center with veins radiating outward.
As incubation progresses, the air cell will get larger. The ideal air cell size before hatching is around 1/3 to 1/2 the size of the egg. An air cell that is too small or too large may indicate improper humidity or other issues.
When candling, you want to look for these signs of normal development:
- Embryo with visible blood vessels
- Air cell the right size (1/3 to 1/2 of egg size)
- No signs of blood or unusual markings
Eggs that are clear or only show a white or yellow yolk are likely infertile. Eggs with blood spots or odd shapes/markings could indicate the embryo died. Remove any eggs that don’t look normal. Candling every few days allows you to monitor the progress and remove any eggs that aren’t developing properly. This helps ensure healthy hatch rates for the remaining eggs.
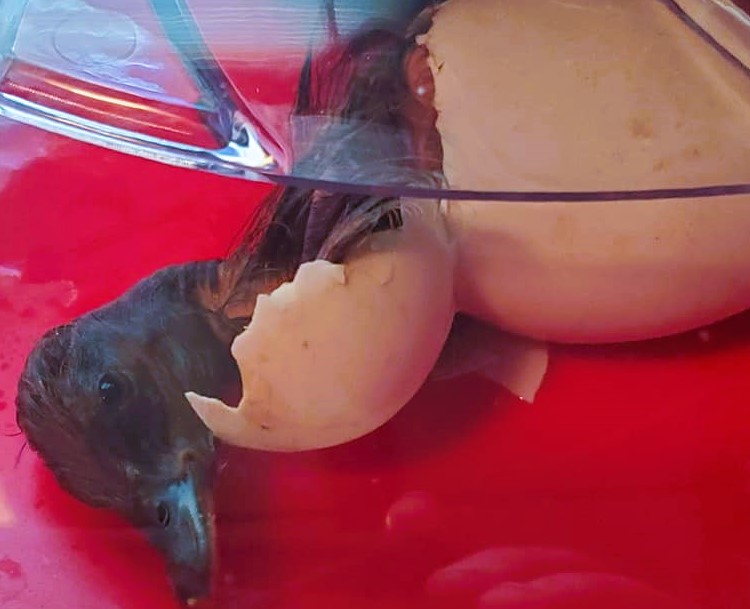
Hatching of Duck Eggs
The incubation period for duck eggs is around 28 days. Muscovy duck eggs take a little longer, around 35 days. As the hatch date approaches, stop turning the eggs 3 days before the expected hatch. This allows the ducklings to get into the hatching position.
On hatch day, resist the urge to help the ducklings emerge. Let nature take its course. Assist only if a duckling struggles for over 12 hours or seems weak. Carefully peel away a small bit of shell, no more than a dime size.
Once hatched, leave the ducklings in the incubator for 12-24 hours until fluffy and dry. Their yolk sac will be absorbed at this time. Remove each duckling gently and place in a brooder with food and water. Discard egg shells and clean the incubator thoroughly before the next use.
Common Incubation Problems and Causes.
Incubating duck eggs can be tricky, and problems can arise even when following best practices. Here are some common issues and solutions when incubating duck eggs:
1. Eggs Not Developing
If candling the eggs shows little to no development, the temperature or humidity levels may be off. Double-check that the incubator temperature is 99.5-100°F throughout incubation. Ideal humidity should be around 55% for the first 25 days, increasing to 65% in the last few days before hatching.
2. Ducklings Dying in Shell
This usually occurs in the last days of incubation. It could be caused by improper humidity or temperature fluctuations. Make sure humidity is 65%+ in the final days. Avoid letting the temperature drop too low at night since this can impact development.
3. Weak or Deformed Ducklings
Lack of egg turning, poor nutrition of the breeding ducks, or poor quality eggs can cause weak or deformed ducklings. Turn eggs at least 3 times per day in the first 25 days. Feed breeding ducks a nutritious diet with plenty of protein and calcium. Use only fresh, high-quality eggs.
4. Early or Late Hatches
The normal incubation period is 28 days. Hatching earlier than day 25 or later than day 33 indicates improper incubation. Re-check temperature and humidity levels. Make sure the incubator is not near drafts or windows which could impact the temperature.
5. Unhatched Eggs
Late-stage duckling deaths, improper humidity, temperatures that are too low, and weak ducklings that cannot break the shell can all cause full-term eggs to not hatch. Assist weak ducklings by carefully cracking the shell. Consider getting a new incubator if issues persist despite troubleshooting.
By monitoring incubation conditions closely and making adjustments as needed, many common issues with hatching duck eggs can be avoided. Don’t hesitate to seek advice from experienced duck egg incubators as well.
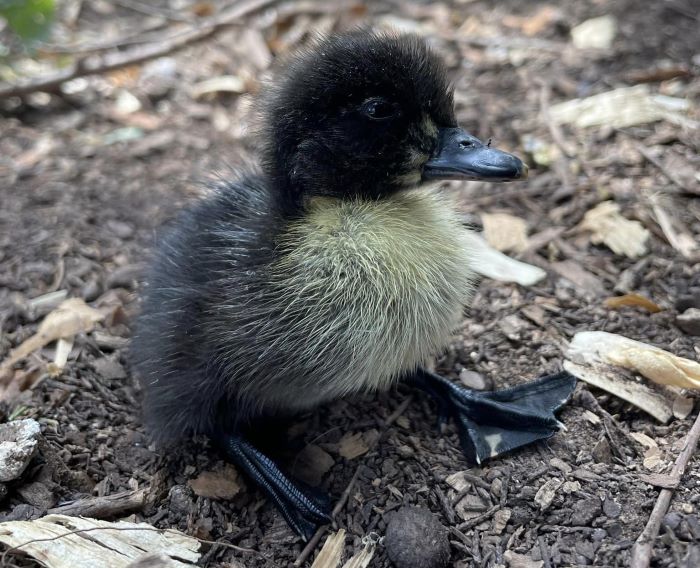
Caring for Ducklings
Once the ducklings have hatched, it’s crucial to provide proper care to help them thrive. Here are some tips:
– Keeping Them Warm: Ducklings cannot regulate their body temperature for the first few weeks of life. Keep them at around 90-95°F using a brooder or heat lamp. Place the heat source at one side of the brooder so they can move closer or farther away as needed.
– First Foods and Feeding: For the first day, provide electrolyte water to rehydrate the ducklings after hatching. Dip their beaks gently to teach them to drink. Introduce a starter feed made specifically for ducklings, with at least 20% protein content.
– Proper Housing structure: Ensure the ducklings are kept in a conducive environment that protects them from predators, pests, and adverse weather conditions.
– Sanitation: Clean up the rearing house regularly. All leftover food and water must be discarded before providing new feed and water. The litter material must be changed at least every 10 days to avoid ammonia buildup.
With proper brooding conditions, nutrition, and care, ducklings will thrive and grow quickly in their first weeks of life. Monitor their health closely and make adjustments as needed.
Conclusion
Incubating duck eggs and hatching your ducklings can be a rewarding experience. With the right incubator setup and care, you can have success hatching a healthy clutch. The ducklings must be kept under good environmental conditions to ensure they survive into adulthood.